Showing posts with label future projects. Show all posts

Dec 9, 2012

Creating the Bottlecap Mosaic, Part 2

In the last post, I described the process for creating the mural image.  In this post, I'll show how th individual tiles were made.  All 24,000 caps were sorted into milk jugs and various sizes of plastic bags.  The point here is that all the caps had to be separated so I could find the appropriate cap for each spot in the mural.  When I was ready to create the tiles, I was surrounded by all my jugs and bags arranged by color.  Although this photo of my workspace on the porch doesn't look too messy, it also doesn't show the piles of stuff under the three tables.

The mosaic had been output as images of smaller tiles, each numbered by row and section.  I followed the image printed on the output sheet, selecting and arranging caps row by row. Once a tile was complete, the caps were moved to my magnetic display board (covered with plastic wrap).  The magnets kept the caps aligned and in the correct orientation during the next steps.  In retrospect, and FYI if you want to try this yourself, making the board was an incredibly useful move.  The project could not have been done without it.


The caps were cleaned with window cleaner (to remove dust, storage grunge & rust), then polished with rubbing alcohol (to dry them and remove any oils).  After a few minutes, the tiles were sprayed with a UV protective acrylic sealer.  Even though the samples at the cabin show no signs of fading after one year (see previous post), I wanted to make sure the colors last as long as possible.  The cabin is in a very dry climate, but protection against rust seemed like a good idea.  Just in case.

After 24 hours of drying time, a piece of tulle (for ballerina tutus) was placed over the caps.  Four dots of glue (equal mix of Elmers and Eileens Tacky Glue) were dropped onto each cap through the tulle.  Because I sealed the caps, regular glue wasn't adhesive enough to hold the caps in place.  As I've mentioned in previous mosaic posts, the glue/tulle combo keeps everything in together during shipping and installation, but allows for easy removal of the tulle at the end of the project.


Once dry, each tile was labeled (tile#, top, bottom, right and left) completely.  The entire mosaic fit into one large box and it was shipped to NM.  Next step installation!  Stay tuned...


Jul 20, 2012

building an horno

Driving through northern NM, one sees hornos (bread ovens) pretty much everywhere. They are especially common in the Pueblos, but are found in the backyards of many older homes. An excellent way to bake breads (and meat) in the summer, the ‘modern’ hornos are based on Spanish/Moorish designs brought over back in the 1500's. Built from adobe, all they require is the right mix of soils, water, and an afternoon. Unlike modern adobe bricks which contain additives to make them water resistant, adobes for ovens must be totally additive free - this makes the project even more do-able for the beginner - and are simple to make at home.

Recently, my family got together to help my father build an horno.  He has built with adobe for over 40 years and founded a school to help people build their own homes.

The base of this horno is dry stacked concrete blocks and adobes. The cooking surface is a single layer of redbrick. For this morning’s work (about 2 hours), four of us were able to mix mud, trim adobes and set 4 layers of bricks. The entire project could easily be finished in a day; add another day for a layer of mud plaster.
The first step is adding a layer of mud onto the bricks.


The interior diameter is sketched onto the bricks and the adobes added on top. Both sides should be level. The mud joints are smoothed with a spoon.


The doorway is made from redbricks set in mud. Each course starts with the door bricks and then follows around with adobe.  


Bricks are cut to size by chopping off chunks. Precision is not important because spaces can be filled with mud.


After the 2nd course, the bricks start to angle up on the exterior side.  Mud is added as before, but now more is added on the exterior edge than the interior one.


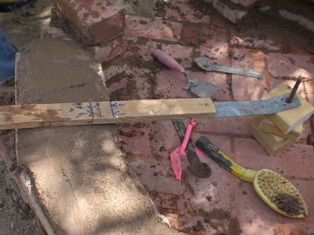
The process from now on creates a 2-d roman arch. The only technological assistant is a piece of rebar and flat stick with a line drawn to mark the interior diameter of the horno.

The adobes are placed on the mud, matching the interior edge with the line on the stick.  


Instead of checking level from side to side, the adobes must be level with the flat edge of the stick to achiive the proper angle for the next course.


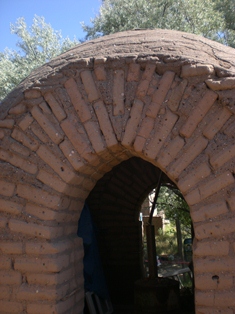
And so it goes, course by course.  At the top the adobes will be nearly vertical and are held in place by friction with the mud.  Believe me, it works.  Once the last adobe is placed in, the ring locks into place and becomes very strong.  This is the process by which elegant adobe buildings were built throughout the middle east (and in some places sill are).

This is the process by which elegant adobe buildings were built throughout the middle east (and in some places sill are).  Shown here is a building in progress with a double roman arch doorway set into an adobe dome.  As lovely as it is outside, it is quite impressive inside looking up. 

Oct 29, 2011

A simple sundial for everyone

One of my goals for the cabin is to have an example of each of the major types of sundials somewhere on site.  During a recent trip, I experiemented with a layout for a reflected ceiling dial inside the house.   It didn’t work well in the living room because of the vigas (not a flat surface), but the sunroon looked promising.
As explained in Sundials: Their Theory and Construction, “A mirror placed horizontally in a southern window will reflect a beam of sunlight to the ceiling of the room.  As the sun moves across the sky from east to west, the reflected sunbeam moves across the ceiling from west to east; and if hour lines are properly drawn upon the ceiling, the sunbeam can be used to tell the time of day or even day of the year.”    
Because there is a low roof overhang preventing solar gain in the summer (to keep the house cool), this sundial will only work when the sun is lower in the sky, late fall through early spring.  The sunroom is very narrow, so the sunbeam falls along the wall, not up on the ceiling.  The plaster is a natural mud plaster, so I’m thinking I’ll calculate the meridian lines and place small stones in the mud to mark the hours.  It will take some time to make the calculations and check their accuracy.  We’ll have to watch, mark, and recheck for a year to be sure.

As you can see in the photos, the beam of light is quite bright, and during this visit, we actually had fun guessing the time by the placement of the light.  Lots of jokes about the time being “window thirty” or “half past the pipe”.

a tiny mirror makes the dial
If you want to try making your own dial, it isn't difficult.  You will have to polish your geometry skills, but the projects are straightforward. Sundials: Their Theory and Construction by Albert E. Waugh is my favorite book about making dials.  It's out of print, but still available through Amazon.  Try looking for it at your library.

Sep 1, 2011

Pretty Little Windows..... maybe

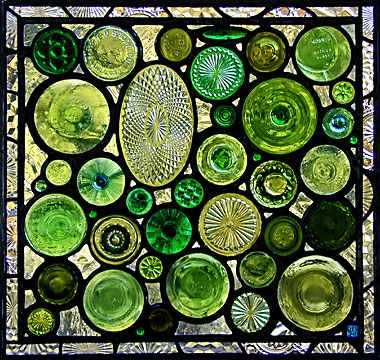
See the website of artist Daniel Maher for info about his work.
Paul and I have been fascinated for years by cutting up old bottles.  It seems everyone has a method, and those methods work... for those people.  We have never been able to succesfully cut bottles.  Oh, we can cut them up and have lots of jagged edges and cracks, but nothing you would be able to safely use.  Recently, I've seen a few examples of people making stained glass out of recycled wine bottles and glassware and I wanted to give it a try for a small window in the cabin.  I ran across a new method (for me) of cutting bottles and, after watching a few YouTube videos, was determined to give it a try.  Of course, it didn't work (lots of jagged edges!).  But Paul was determined.... and he found a way.

The premise is based on a cutting around the bottle with a glass cutter.  Here, the bottle is rolling on some old wheels we found, bottom against a straight edge, and the cutter is mounted upside down on the piece of wood (attached to the table with a hinge).  Note the mini propane torch and container of icewater.  Don't forget the gloves and safetly glasses!

First, while holding the bottle firmly against the straight edge, turn it while pressing down with the cutter.


Second, quickly turn the bottle while heating with a little propane torch (the kind everyone has for their creme brules).  The key here is turing quickly and having the tip of the flame only on the cut.  You may see videos with candles instead - we never got that to work, never.


Immediately, plunge the bottle into ice water.  You may hear a crack and have the bottom fall off; more likely you will have to remove the bottle and tap gently to separate the two pieces.


And there it is... the bottom of a bottle cut cleanly and evenly.  Very nice!  The next step is making the stained glass window - that's a post for another day.


The first apparatus was cobbled together with items from the shed and after some trial and error with the process, we made a few adjustments.  We replaced old wheels with some casters that didn't wobble- important in keeping the bottle straight.  We also aligned both the bottom of the bottle and cutter to the straight edge. 


If you give this a try yourself, the important thing is to have a single clean cut around the bottle.  If the begining and ending of the cut don't meet perfectly, you will have a jagged edge.  The bottle and cutter must be kept aligned during the cutting. Of course, you can buy a device that does all this for you, but why?  Once you figure out how to do this (and it does take a bit of practice), you will have success 95% of the time.  I'm leery of using this process to make drinking glasses, but for stained glass, I think it works fine.  The edges are quite sharp and still must be filed.  

Stay tuned for future posts on the window making.


Jul 30, 2011

A new life for old wood

The sunroom, see previous posts, was originally designed to be a greenhouse attached to the cabin. Three walls are mud-plastered adobe; the south "wall" is mostly window.  This frame wall is now covered with Tyvek and ready for stucco  and I was going to cover that with stucco.  I decided the stucco would never look right next to the adobe and brick, so I then I thought I would do mud plaster there too.  Then I saw a reclaimed wood wall online (not this one, but similar) and the lightbulb went off.  Thinking about the stuff around the yard at the cabin, I thought I could scrape up some wood, but most of it turned out to be 2x and 3x material, too thick (I'll use it for bookshelves).
No, my mom is not a hobbit.
I scrounged at my Dad's, but he had surprisingly little.  My last stop was my Mom's place.  She also had very little around the house, which was a surprise because she hoards everything.  While parking, I noticed some old pallets by the old horse pens. We waded through the enormous weeds to take a look....

The old goat pens.
My mom said I could have the pallets, but when I went to take a closer look, they were actually half buried in goat manure - not acceptable. Further investigation however, revealed a treasure trove of boards along the goat pens totally hidden by the weeds.  The boards were 1x10s, either four or eight feet long - perfect.  Each is an elegant silvery color and all are in very good shape.
A small sample of the harvested boards.
There is a lot of wood here, so even if I bang-up or rip some of the boards, there are plenty to spare.  The big adventure will be tramping through the weeds, fighting the spiders, and prying each board off the fenceposts.  The rewards will be great.  There's enough wood here to completely cover the sunroom walls, make some shelves in the kitchen and have lots left over for future projects.  Stay tuned

Dec 10, 2010

kitchen mosaic

The kitchen as seen from the living room.
The kitchen is getting to the point where it's just detail stuff now.  Of course, the stove needs to be put in and the plumbing hooked up, but those are jobs for next summer.

The room itself is small and quite narrow.  You can see most of it in the photo above.  To the right, behind the arch is another two feet of width, just enough for a small table and some chairs.  The walls you can't see (behind the arch and to the right) are covered with a lovely lime plaster (my father's work).  The wall to the left is painted (to match the plaster) drywall and the far wall is exposed burnt adobe. 

The burnt adobe is nice and I decided to leave it exposed.  The one thing I don't like about that wall is the ugly concrete bondbeam above the adobe.  I plan to put up a shelf/opencabinet for dry goods stored in canning jars, but it will be small and the bondbeam will still show.

So, what to do to make it pretty?   Since I have covered so many other sins in the cabin with tiles, why not this too?  I have decided to do a mosaic, but it's going to be a subtle one.  The room is dark and I don't I don't want to have so many things going on on the walls that the eye is frantically finding a place to rest. 

At this point, I think I'll create a night scene (not sure what yet) and have some ghost dogs running.  Darwin will be there for sure (see previous post) and maybe Simba, my sister's dog.  Updates will follow!  Stay tuned.

Nov 8, 2010

Bottlecap Mural Update

Sorted caps awaiting storage.

As of this writing I have about 5000 bottlecaps.  My estimate is that I will need approximately 15,000 caps, so I'm about 1/3 of the way there.  Yay!

I receive donations every week and I'm still finding unique caps.  Some people give me a few caps at a time and others give me gallon bags full.  Some people are very consistent in what they drink, others strive for variety.  I work in a library and word has spread about my project, so I'm actually getting caps from total strangers now - the project has definitely gained a life of it's own!

One square foot of caps - that's a lot of beer!
I've started thinking about design ideas and found a book on my own shelves that may help me out.  Designs and Patterns from North African Carpets and Textiles may be my major source of inspiration.  Most of the designs are based on an offset grid (the caps above are arranged in this manner); many are strip-based (borders), but others are whole carpet patterns.  There are a lot of geometrics, but plenty of animals and plants too.

I will need about 100 caps per square foot and I think I have enough cap diversity to start trying samples.  Stay tuned for more!

Jul 31, 2010

Bottlecap Mural - caps needed!

The current cap collection

I'm going to take a break from the history of the place to describe a future project.  For those of you who know me, I get my heart set on something and then can't let it go.  If it's something time-consuming, requires lots of little pieces, and I've never attempted anything like it before - that's the project for me!  Thankfully, I've managed to finish most of my projects associated with the cabin, and they've all turned out fine.

So, for this crazy project, some history.....    I have a distinct memory from my childhood of running my hands over an adobe wall decorated with bottlecaps.  The caps had faded, some were dented, and the pattern was pretty simple.  I don't remember if I saw this in Tucson (when I was really little), in the Albuquerque area when I was a bit older, or in visits to the Santa Fe area.  I mentioned this to my sister, and she says the image rings a bell for her also.  I know that there isn't anything like this in Albuquerque now, but I did see similar things in Sonora, Mexico when I was in grad school.


A search on the internet didn't reveal anything like my memories, although this patio, barn entrance, and road repair have a similar rustic 'feel'.  I found other examples of bottlecap art online.   Molly B. Right creates portraits from flattened caps and the detail and expression she obtains is phenomenal.  Her aged caps are overlapped and adhered to a substrate, giving the portraits a lifelike color palette.  This mural in Portland utilizes a hexagonal grid, and provides a good level of detail when seen from a distance.

In any case, I've decided I want a bottlecap mural on my cabin, and I've the perfect place - the north-facing exterior wall where I plan to have a deck in the future.  I've decided to go with a traditional mud plaster (earlier posts show the currently exposed adobe walls), and the caps can just be pressed into the wet mud when the plaster is put on.  I will likely make 12" 'tiles' of caps temporarily adhered to paper for simplicity of installation.  


The plan is to plaster the exterior the summer or fall of 2011; in the meantime, I'm collecting caps, thousands of caps. I have a few ideas for images, but I won't make a decision until December 2010.  By that time, I should have an idea of what color distribution I'm getting and I can estimate how many caps I would have by next summer.  That's the plan. 

To all my friends and family, please save your caps!  Email me for more collection/shipping info.  Thanks in advance for your beverage consumption.