Showing posts with label living room. Show all posts

Apr 5, 2013

In through the out door, Part 2

the old finish
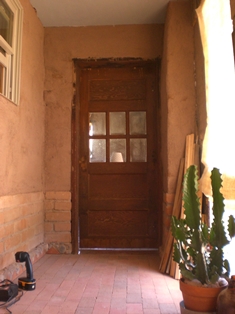
In a previous post, I discussed the issues with the living room door.  As mentioned, I'm not 100% happy with this door, but it works and it's free, so it's great!  The next step in the door saga was painting to help it blend in with the decor.  One side was white (with many stains) and the exterior (now sunroom) side was wood with peeling varnish.

red on both sides of the room
After sanding for hours, I taped off the glass to prime all surfaces.  There were quite a few pits and gouges, but I left them as is (for character). The entire thing was primed and painted; sunroom side red to match the lockers on the opposite wall and living room side a pale blue-grey.  The funny thing about this project is now the door looks so good it's nicer than most of the other woodwork in the house.  I just can't win.      

Mar 8, 2013

Wine Bottles to Windows Part 2

window in progress
Last fall, I finished a few more small windows for the cabin.  My usual modus operandi for special projects is to ship raw materials to Albuquerque, transport down south, then work in peace.  While at the cabin, I have to use what I have on hand because anything I might need is 250 miles and 4 hours away.  As a result, my work is 'unique.'

The goal for this project was to cover the 14" square window in the living room and work on the tiny upper windows of the kitchen.  I've shown my process in a previous post; nothing too different here.

waiting to be installed
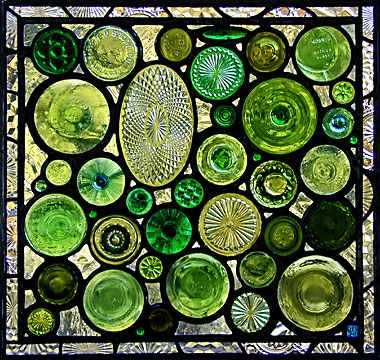
I know, I know, the end results shown here are a bit messy, but I'm happy with the result.  I'm especially pleased with the green windows.  They  will be installed near the ceiling and provide a bit of subtle light.    

The main components of these windows are wine bottles (see the previous post on cutting).  I wanted clear glass in the living room and so had to drink a lot of not-so-great wine in clear bottles to get the glass I wanted.  One hint for beginners to stained glass - don't start working with lots of circles.  Fitting pieces to fill the spots between rounds is a hassle (I hate cutting glass), and I usually end up using a huge amount of solder to fit the gaps. Be warned, this is not good technique. 

One more window to go!  Stay tuned...

Aug 17, 2012

in through the out door

Between the sunroom and living room is a doorway.  The door was removed years ago to finish plastering both rooms. This spring it was returned to it’s former place.  What a job!  This is an old-fashioned (at least 50 years old), exterior, wooden, security door.  It is 2 inches thick with steel re-enforced windows - a chunk - and, as far as I can tell, nearly indestructible. It has lived outside for 2 years exposed to the elements with zero negative effects - a tough door.

As with so many other things in the cabin, there were issues.  My dad found this door somewhere at some point in the 70's (he didn’t buy it) and built the doorway around it.  But not in a normal way.  The doorway is formed from boards of various dimensions.  Each side is different.  No stops for the door were installed.  The old hinges were huge and extended out from the doorway.  There was no doorknob, just a hasp screwed haphazardly onto a board and a combination lock hooked through it for closure.

Paul and I wrestled the door back into place.  It did have to be cut down a bit to make room for the mosaic in the doorway (see previous post).  Otherwise, it seemed to fit, but those hinges were still a problem. I had bought a variety of door hinges in the hopes that something would work better (i.e. normally), but because of the way the doorway was constructed, there was no way to use any of them.  Back to the ginormous old ones.  An additional problem was that the adobe+plaster behind the doorway would crumble (and fall away) whenever normal wood screws were used.  The screws were quite hefty to hold such a massive door and were about 3" long. Poor Paul had to use a hacksaw to cut 15 screws shorter.

In the end, the door is pretty much the same as it was before.  Sigh.  Because the doorway isn't plumb, I don't want to hassle with attempting installation of doorknob hardware.  I'll probably use a ball latch that will catch as the door swings.  I plan to paint the sunroom side red (matching the lockers opposite) and the living room side a pale blue-grey.  As it is now, the aged white side doesn't have an elegant shabby chic look, more like a dirty, battered one.  Stay tuned for an update on the painting - perhaps occuring soon!

Dec 18, 2011

frontdoor mosaic


The installation

As mentioned in previous posts, the doorways of this house are pretty ugly.  In this case, the doorway between the sunroom and living room was a series of cement blocks, open end up, filled with concrete and rocks, with a few tips of rebar sticking up for good measure.  Not fun to walk on, and not the least bit attractive.  I could live with it except the whole thing is also a huge dirt magnet.  I decided to do a simple mosaic to cover the whole thing.


View to the living room
The mosaic is made of basic ceramic tiles from Home Despot; two colors terra cotta and grey.  The hinge end of the doorway is plain, whereas the open end has a sun motif.  The main background is offset bars, simple but still quite attractive.  The whole thing was made in IL as usual, then shipped to NM for the install.  The process is the same as usual: adhesvie, slap it down, wait for set, then grout. In case you're wondering, the grout does not go to the edge of the brick, there is a hairthin space to allow for differential expansion of the materials. 


The final mosaic is attractive, smooth, and oh so easy to clean! Much better than the original.  Once the bricks are cleaned after the (endless) construction, the colors of the tile and brick will be more similar.  Very nice effect.


Sep 1, 2011

Pretty Little Windows..... maybe

See the website of artist Daniel Maher for info about his work.
Paul and I have been fascinated for years by cutting up old bottles.  It seems everyone has a method, and those methods work... for those people.  We have never been able to succesfully cut bottles.  Oh, we can cut them up and have lots of jagged edges and cracks, but nothing you would be able to safely use.  Recently, I've seen a few examples of people making stained glass out of recycled wine bottles and glassware and I wanted to give it a try for a small window in the cabin.  I ran across a new method (for me) of cutting bottles and, after watching a few YouTube videos, was determined to give it a try.  Of course, it didn't work (lots of jagged edges!).  But Paul was determined.... and he found a way.

The premise is based on a cutting around the bottle with a glass cutter.  Here, the bottle is rolling on some old wheels we found, bottom against a straight edge, and the cutter is mounted upside down on the piece of wood (attached to the table with a hinge).  Note the mini propane torch and container of icewater.  Don't forget the gloves and safetly glasses!

First, while holding the bottle firmly against the straight edge, turn it while pressing down with the cutter.


Second, quickly turn the bottle while heating with a little propane torch (the kind everyone has for their creme brules).  The key here is turing quickly and having the tip of the flame only on the cut.  You may see videos with candles instead - we never got that to work, never.
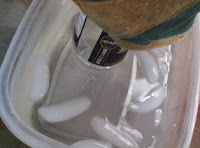


Immediately, plunge the bottle into ice water.  You may hear a crack and have the bottom fall off; more likely you will have to remove the bottle and tap gently to separate the two pieces.


And there it is... the bottom of a bottle cut cleanly and evenly.  Very nice!  The next step is making the stained glass window - that's a post for another day.
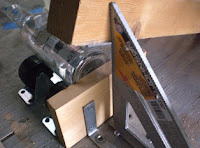


The first apparatus was cobbled together with items from the shed and after some trial and error with the process, we made a few adjustments.  We replaced old wheels with some casters that didn't wobble- important in keeping the bottle straight.  We also aligned both the bottom of the bottle and cutter to the straight edge. 


If you give this a try yourself, the important thing is to have a single clean cut around the bottle.  If the begining and ending of the cut don't meet perfectly, you will have a jagged edge.  The bottle and cutter must be kept aligned during the cutting. Of course, you can buy a device that does all this for you, but why?  Once you figure out how to do this (and it does take a bit of practice), you will have success 95% of the time.  I'm leery of using this process to make drinking glasses, but for stained glass, I think it works fine.  The edges are quite sharp and still must be filed.  

Stay tuned for future posts on the window making.


May 9, 2011

Meet the Locals: Spring Surprise

scorpian - unknown spp

 The first trip of the season was wonderful.  After a hard day's work toting rocks from here to there in the yard (subject of upcoming posts), I was reclining in an old chair, crocheting a summer top and listening to an audiobook.  Out of the corner of my eye, I saw something.  Just over my shoulder, a little (~1") scorpian was wending his way up the wall.  Hmmmmm.  I took a photo (forgive me for not including a finger for scale) and put him in a jar.  I set him on the front stoop to consider his predicament and went back into the house.
Not too much later, another, larger scorpian caught my eye traipsing along the floor/wall margin.  Another jar, another trip to the stoop.   DARN!  I sleep on the floor on an air mattress and don't like the idea of having "friends" with me. 

I know that there are all kinds of invertebrates around (I've seen them), but the house has been sealed up fairly well for about a year.  However, where there's a will, there's a way.  This was March and during the changing of the seasons, there is a lot of flux in the invertebrate populations.  The scorps were waking up and looking for new, interesting places.  Because the house is adobe, the walls are considerably warmer than the yard at night, and scorpians are drawn to warmth.

I am happy to report that, even though I caught a few more scorps in the house, I didn't have any negative interactions with them when the lights went out. 

Jul 28, 2010

Plaster Adventure

Although the "shell" of the cabin is done, the interior finishing work is not.  Of all the rooms, the living room was most complete.  The brick floor was laid by Doug Ring over 15 years ago and the windows have been in for a long time as well.  The adobe walls have been in various states of rough coat plaster for close to a decade; some parts of the room had no rough coat at all.  The picture below shows an area with some of my father's "creative" rough coat.  The burnt adobes on the lower portion of the wall will be left as is - perhaps sealed for more color in the future.  

Before plastering

After some research and suggestions from my sister, I decided to apply a natural clay plaster to the living room walls.  My sister had used American Clay to plaster her finished basement and I really liked the look.  I had my heart set on the 'Porcelina' finish, which is supposed to be the most difficult to apply, but it was soooo beautiful.  To prepare for the plastering, my contractor, Kenny Sutton, kindly and patiently applied a rough coat of mud over the bare adobes and my Dad's creative rough coat experiments.  This past June, my sister, nephew, husband and I met at the site with the goal of finishing the plaster, and the room.

The first coat of clay is an off-white color - a big difference from the mud rough coat.  The picture below shows us plastering away.  It wasn't a difficult process - just a series of movements that are new.  The hardest part was keeping the coat thin (only credit-card thickness) because our mud coat was a little too sandy.

First clay coat

Below we are adding the final coat (the darker color). This coat was supposed to be even thinner than the first, (business card thickness) but we weren't too careful about that.  This coat went up quickly because the first clay coat was so much smoother than the mud coat.  Because the photo shows the plaster wet, you can't tell what it looks like finished, but trust me, it's beautiful!  The overall look is similar to Venetian plaster.  The walls look like velvet and they are soft to the touch.  The plaster made a huge difference in the atmosphere of the room - the color is a very soothing grey/beige called Chacolatte.

Final clay coat


We managed to avoid any major aches or pains from the repetitive movements and high reaches, but we couldn't avoid the blisters.  I thought it was great that my husband and I had matching blisters - how romantic is that?