Showing posts with label bottlecap mural. Show all posts

Dec 9, 2012

Creating the Bottlecap Mosaic, Part 2

In the last post, I described the process for creating the mural image.  In this post, I'll show how th individual tiles were made.  All 24,000 caps were sorted into milk jugs and various sizes of plastic bags.  The point here is that all the caps had to be separated so I could find the appropriate cap for each spot in the mural.  When I was ready to create the tiles, I was surrounded by all my jugs and bags arranged by color.  Although this photo of my workspace on the porch doesn't look too messy, it also doesn't show the piles of stuff under the three tables.

The mosaic had been output as images of smaller tiles, each numbered by row and section.  I followed the image printed on the output sheet, selecting and arranging caps row by row. Once a tile was complete, the caps were moved to my magnetic display board (covered with plastic wrap).  The magnets kept the caps aligned and in the correct orientation during the next steps.  In retrospect, and FYI if you want to try this yourself, making the board was an incredibly useful move.  The project could not have been done without it.


The caps were cleaned with window cleaner (to remove dust, storage grunge & rust), then polished with rubbing alcohol (to dry them and remove any oils).  After a few minutes, the tiles were sprayed with a UV protective acrylic sealer.  Even though the samples at the cabin show no signs of fading after one year (see previous post), I wanted to make sure the colors last as long as possible.  The cabin is in a very dry climate, but protection against rust seemed like a good idea.  Just in case.

After 24 hours of drying time, a piece of tulle (for ballerina tutus) was placed over the caps.  Four dots of glue (equal mix of Elmers and Eileens Tacky Glue) were dropped onto each cap through the tulle.  Because I sealed the caps, regular glue wasn't adhesive enough to hold the caps in place.  As I've mentioned in previous mosaic posts, the glue/tulle combo keeps everything in together during shipping and installation, but allows for easy removal of the tulle at the end of the project.


Once dry, each tile was labeled (tile#, top, bottom, right and left) completely.  The entire mosaic fit into one large box and it was shipped to NM.  Next step installation!  Stay tuned...


Nov 9, 2012

Creating the Bottlecap Mosaic, Part 1


You may have been wondering about the status of the mysterious bottlecap mural.  I know! I haven’t said much about it in a while. After many months, nay years, progress has been made!  Earlier this spring I had collected about 30K caps, enough to have all the colors I needed.  I spent a lot of time sorting & cataloging the caps, then selected a design. 

I decided to utilize an oriental carpet design because I didn’t want anything that looked too ethnic or strongly geometric.  I scanned this image from a book, cropped it a bit, duplicated it and created a final mosaic design that would be about 6 ‘ tall and about 14’ wide. 


The next step was using the freeware software package Andrea Mosaic. The software was designed to do photomosaics (perhaps you recall their popularity ~10 years ago) and requires a target image and a database of photos from which to recreate the image. 

I photographed each unique cap on a grey background (to simulate adobe), then edited all the images to a square format.  Andrea Mosaic allows you to set how many times an image can be repeated, whether or not the same image can be adjacent, if rotation is acceptable and the graininess of the final mosaic.  


I spent about an hour tweaking settings to give me a mosaic with a good balance of detail and color blending.  The software will break your output into pieces so you can work with smaller sizes (very helpful for large mosaics), so I printed out pages that would correspond to tiles about 10x14 inches.

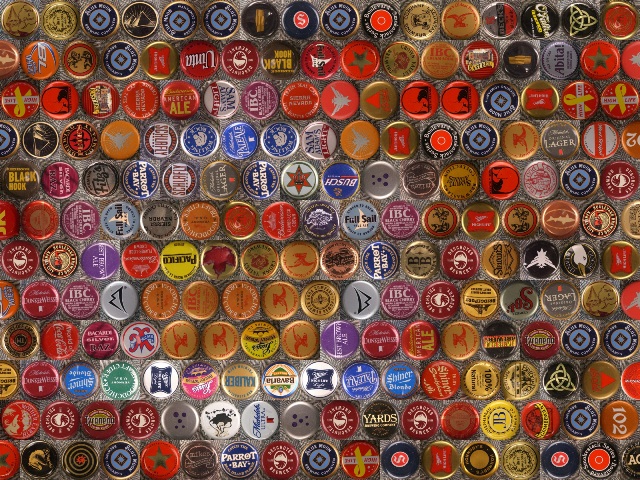
The tile shown here is typical output and if you look closely you may be able to recognize some of the brands of beer, cider or soda.  The next step was creating the tiles. That was a lot of work and I'll describe the process in the next post


Stay tuned!

Mar 9, 2012

Testing the Caps


Well, after a long delay, I am ready to start working on the promised bottlecap mural!  You've been waiting, I know.  I have settled on a design and I will follow this post with another in a few weeks describing the process and a few preview images.  Here, I'm highlighting the bottlecap test process and showing the basics of how the mural will be installed.

Small tiles of caps were made in IL, then taken out to NM.  The process is the same as the one I've described in other mosaic posts, the only difference is that the caps have to be cleaned with alcohol, then sprayed with an acrylic sealer (to prevent rust and UV fading.)
The mural will be installed directly in the mud plaster on my back porch.  Mud will be slathered on (here, quite sloppily) and the caps pressed directly into the mud.  
The process of working with the mud moistens the glue holding the tulle in place.  After a few swipes, the tulle can be pulled off and the glue bits come off easily.  I will probably finish the mural with a darker clay wash to give the spaces between the caps a darker background


These caps were installed last fall and after a long sunny winter of direct sunlight exposure, I will assess how much (if any) fading has taken place.  The caps shown actually have a few different surface treatments, so I'll know which sealer works best.  The mural will be installed on a shady north wall, but I want it to last as long as possible.

Stay tuned for more!

Jul 16, 2011

Dividends in the form of caps

After collecting over 17,000 caps from friends and strangers around the country, I have quite a nice bottlecap collection - an unforseen dividend from the mural project.  I wanted to display the collection, but cruising the internet only provided unattractive (coffee tables) or permanent  (glue and epoxy) options.  I wanted something attractive, with the ability to move my caps around.  I came up with the following design - easy to do and not too expensive.  I had all the materials in the shed; the only purchase was the magnets (about $30 for 400).


The caps are placed on magnets set on top of wooden disks.  The extra height provides some dimension to the display and gives good finger grip when moving caps.  The 389 disks were cut from wooden dowels.


The back of the display is a piece of 1/2" plywood.  I measured out 1 1/4" squares in an offset grid so that the magnets (and caps) would be evenly spaced.  After making the grid, I glued 1/2" square trim around the edges, nothing fancy, but it gives a nice border to the display board.


Glueing the disks was pretty straightforward.  I used wood glue since each disk wasn't going to hold a lot of weight. I wasn't too worried about centering perfectly because the caps could be moved around on the magnets - tweaking would be easy to do by hand.


Glueing the magnets was a bit trickier.  When designing the board, I forgot one of the most important aspects of magnets, their magnetic properties towards one another.  Adjacent magnets would repel one another and slip off the disks before the glue (E-6000) set.  So, the magnets had to be glued every other row - it took about 3 days to finish this step.


Here I am placing caps on the finished display board.  Quite nice, if I say so myself.  The finished board has room for about 25 more caps, but since everything is painted black (see the top photo), you don't really notice the empty spots.  I can move caps around to my hearts content and everything is at eye level.  If the caps get dirty, I can pop them off and wash them.  The only downside to the board is that it is quite a bit heavier than one would expect.  I wouldn't suggest using thinner plywood, however (it warps easily). 

Mar 4, 2011

Bottlecap Update

The gift of caps - who can refuse?
The caps keep rolling in!  This project seems to have taken on a lot of inertia; people just love to give me their caps.  I work at the library and strangers bring me bags of caps.  We've even had a sackfull in the bookdrop.  A friend's cousin from out of state recently sent a box (see above) with over 2400 caps - amazing! 

The current total is just over 12,000.  I haven't done anything to restrict or select for certain colors or brands, so I have quite a selection of designs.  I have favorites and I'm hoping I get some more of the brighter colors in the next few months. Surprisingly, there aren't as many of the big brands as one would expect.  It seems that the people who are donating like specific brands or drink a diversity of beers.  All the better for me! 

The current color breakdown is as follows:
Greens                       944
Golds                         516
Gold w/ red center       512
Blacks                      1092
Blues                       4380
Silvers                       252
Whites                     2269
Reds                        1515
Yellow/Orange             551

Now that the end of the collection is in sight (I'll collect through the end of May), I have to get more serious about final design options.  The goal is to post at least three possibilities in the next few weeks and have everyone who has donated at least one cap, vote for the pattern they like the most.  Stay tuned...

Nov 8, 2010

Bottlecap Mural Update

Sorted caps awaiting storage.

As of this writing I have about 5000 bottlecaps.  My estimate is that I will need approximately 15,000 caps, so I'm about 1/3 of the way there.  Yay!

I receive donations every week and I'm still finding unique caps.  Some people give me a few caps at a time and others give me gallon bags full.  Some people are very consistent in what they drink, others strive for variety.  I work in a library and word has spread about my project, so I'm actually getting caps from total strangers now - the project has definitely gained a life of it's own!

One square foot of caps - that's a lot of beer!
I've started thinking about design ideas and found a book on my own shelves that may help me out.  Designs and Patterns from North African Carpets and Textiles may be my major source of inspiration.  Most of the designs are based on an offset grid (the caps above are arranged in this manner); many are strip-based (borders), but others are whole carpet patterns.  There are a lot of geometrics, but plenty of animals and plants too.

I will need about 100 caps per square foot and I think I have enough cap diversity to start trying samples.  Stay tuned for more!

Jul 31, 2010

Bottlecap Mural - caps needed!

The current cap collection

I'm going to take a break from the history of the place to describe a future project.  For those of you who know me, I get my heart set on something and then can't let it go.  If it's something time-consuming, requires lots of little pieces, and I've never attempted anything like it before - that's the project for me!  Thankfully, I've managed to finish most of my projects associated with the cabin, and they've all turned out fine.

So, for this crazy project, some history.....    I have a distinct memory from my childhood of running my hands over an adobe wall decorated with bottlecaps.  The caps had faded, some were dented, and the pattern was pretty simple.  I don't remember if I saw this in Tucson (when I was really little), in the Albuquerque area when I was a bit older, or in visits to the Santa Fe area.  I mentioned this to my sister, and she says the image rings a bell for her also.  I know that there isn't anything like this in Albuquerque now, but I did see similar things in Sonora, Mexico when I was in grad school.


A search on the internet didn't reveal anything like my memories, although this patio, barn entrance, and road repair have a similar rustic 'feel'.  I found other examples of bottlecap art online.   Molly B. Right creates portraits from flattened caps and the detail and expression she obtains is phenomenal.  Her aged caps are overlapped and adhered to a substrate, giving the portraits a lifelike color palette.  This mural in Portland utilizes a hexagonal grid, and provides a good level of detail when seen from a distance.

In any case, I've decided I want a bottlecap mural on my cabin, and I've the perfect place - the north-facing exterior wall where I plan to have a deck in the future.  I've decided to go with a traditional mud plaster (earlier posts show the currently exposed adobe walls), and the caps can just be pressed into the wet mud when the plaster is put on.  I will likely make 12" 'tiles' of caps temporarily adhered to paper for simplicity of installation.  


The plan is to plaster the exterior the summer or fall of 2011; in the meantime, I'm collecting caps, thousands of caps. I have a few ideas for images, but I won't make a decision until December 2010.  By that time, I should have an idea of what color distribution I'm getting and I can estimate how many caps I would have by next summer.  That's the plan. 

To all my friends and family, please save your caps!  Email me for more collection/shipping info.  Thanks in advance for your beverage consumption.