Aug 3, 2012

Sometimes a little grey is good

When facing the kitchen shelves with aged wood, I didn’t want to fuss with mitered joints.  I didn’t think it was necessary.  A small detail however, is that a lapped joint shows a bit of clean, non-aged wood right at eye level.  What to do?

I remembered reading about aging wood using tea, vinegar, and rusty nails.  Having all those items at hand in the cabin, I set to work.  At the time I couldn’t remember the proper order of treatments, and I don’t know if it really matters.  The basic concept (familiar to anyone who works with natural dyes) is mixing tannins with iron to create a black pigment.  On wood, the color is grey and it really does match aged wood.  The surface texture will differ, but for a tiny bit of wood, at an edge, this is a great technique.

In the photo above, you can see the effects of two applications on one half of an aged wood scrap; I used one application for my shelf. I also treated the top and bottom surfaces of the shelves (1/4" plywood).  The surfaces are a smooth grey and match the color of the edge closely enough that the entire shelf seems like one very thick board.

I’ve found a recipe online similar to the one I recall from the past.  If you try the technique, play around with the number of applications of each solution to get the intensity of grey you need.  There is a strong vinegar smell while the wood is moist, but disappears when dried.  The solutions are relatively safe, but even so, I wouldn’t leave them around kids or pets; they can be safely poured down the sink when you are finished.

Jul 20, 2012

building an horno

Driving through northern NM, one sees hornos (bread ovens) pretty much everywhere. They are especially common in the Pueblos, but are found in the backyards of many older homes. An excellent way to bake breads (and meat) in the summer, the ‘modern’ hornos are based on Spanish/Moorish designs brought over back in the 1500's. Built from adobe, all they require is the right mix of soils, water, and an afternoon. Unlike modern adobe bricks which contain additives to make them water resistant, adobes for ovens must be totally additive free - this makes the project even more do-able for the beginner - and are simple to make at home.

Recently, my family got together to help my father build an horno.  He has built with adobe for over 40 years and founded a school to help people build their own homes.

The base of this horno is dry stacked concrete blocks and adobes. The cooking surface is a single layer of redbrick. For this morning’s work (about 2 hours), four of us were able to mix mud, trim adobes and set 4 layers of bricks. The entire project could easily be finished in a day; add another day for a layer of mud plaster.
The first step is adding a layer of mud onto the bricks.


The interior diameter is sketched onto the bricks and the adobes added on top. Both sides should be level. The mud joints are smoothed with a spoon.


The doorway is made from redbricks set in mud. Each course starts with the door bricks and then follows around with adobe.  


Bricks are cut to size by chopping off chunks. Precision is not important because spaces can be filled with mud.


After the 2nd course, the bricks start to angle up on the exterior side.  Mud is added as before, but now more is added on the exterior edge than the interior one.


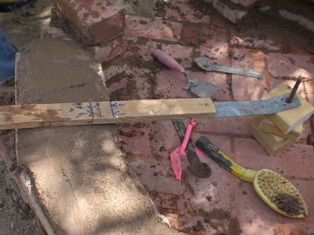
The process from now on creates a 2-d roman arch. The only technological assistant is a piece of rebar and flat stick with a line drawn to mark the interior diameter of the horno.

The adobes are placed on the mud, matching the interior edge with the line on the stick.  


Instead of checking level from side to side, the adobes must be level with the flat edge of the stick to achiive the proper angle for the next course.


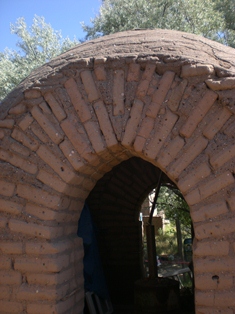
And so it goes, course by course.  At the top the adobes will be nearly vertical and are held in place by friction with the mud.  Believe me, it works.  Once the last adobe is placed in, the ring locks into place and becomes very strong.  This is the process by which elegant adobe buildings were built throughout the middle east (and in some places sill are).

This is the process by which elegant adobe buildings were built throughout the middle east (and in some places sill are).  Shown here is a building in progress with a double roman arch doorway set into an adobe dome.  As lovely as it is outside, it is quite impressive inside looking up. 

Jul 6, 2012

Adventures in Shelving

Work in the kitchen is almost complete.  One of the last steps is installation of shelving.  Because the room is so small and relatively dark, I decided against upper cabinets and chose to have a single row of shelves across the wall.  I have to wait until the on-demand water heater is installed to put in the long shelf, but recently, Paul was able to work on the shorter shelf.

All walls in the cabin are solid adobe, but the south wall (along which the plumbing runs) has drywall covering the bricks.  This was the simplest way to deal with covering pipes and had the added benefit of creating a plumb surface along which the lower cabinets could run and providing an easier material into which shelves could be installed.

I don’t like the look of thick supports under shelves, but thought that something would be needed for support.  These shelves will hold all the dishes, so there is potential for a heavy load.  I bought some lovely cast iron brackets (see my Pinterest page for a link), but was still concerned that more support would be needed.  Better to go overboard, than have all my bowls crash down.

After consulting various online sources, Paul and I designed a variation of a torsion shelf based on two websites, one from popular mechanics and the second from a blog.

The first step was creating the hollow shelf.  A frame was made from scrap 1x2's, screwed and glued securely (you can see some finger wipes in the photo).   A skin of 1/4" plywood was glued on the top and bottom.  I wasn’t concerned about perfect alignment (although Paul was) of the various parts because I wanted to face the edges of the shelf with a strip of aged wood (see previous posts about the sunroom).  The aged wood would visually create a thick board, match the vigas, other finishes in the cabin, and just add to that casual, ‘rusticity’ that you see in old adobe homes.


A cleat was screwed into the studs on the wall.  As with the frame, the cleat was scrap wood.  It fits inside the torsion shelf and doesn’t show, so it doesn’t have to be attractive.  It does have to fit snugly, so Paul spent some time sanding to get the shelf well seated on the cleat.

The shelf is then slid onto the cleat and securely screwed onto it. This photo shows the prefitting, before the aged wood was added to the edges.  Interestingly, the adobe wall to the left is so out of plumb that when the shelf was level, it looked decidedly unlevel. We had to fiddle with it a bit to make it look good to the eye.   Ahhh, the joys of working in an adobe home.


Most torsion shelves are sanded and painted before the final install.  Visually the shelves appear to float and have a very modern look.  We installed cast iron brackets before adding the aged wood to the sides.  A side benefit of the torsion shelf is that we didn’t have to worry about the brackets not being screwed into a stud.  We did use expansion bolts (just in case) and the result is a very sturdy shelf.


What a nice shelf! Of course, it would be even better without the junk on the counter and through the house.

Jun 25, 2012

Out of the frying pan, into the ... flood

View from the cabin: ash blowing off the burnt mountain
As of today, the Whitewater Baldy Fire is 87% contained.  I went to NM last week to check the cabin and view the awfulness for myself.  As much as one mentally knows about the damage, seeing it in person takes the situation to another level.  This fire is bad, very bad.  Areas that burnt in the past 10 years and were beginning to recover, burned again.  Photos from the Forest Service show upper elevation areas of the Gila appearing like the Mt. St. Helens eruption - nothing but grey ash and black, flattened trees.  Entire watersheds have been destroyed, including the Whitewater, where the cabin is located.


Now the big concern is flooding.  There is nothing to absorb or hold back any rainfall and the Forest Service is calling for massive floods in many drainages.  The situation is considered an imminent emergency. Monsoon rains will start soon, and for the first time I can think of, most people are hoping for light rains; keep in mind that we have been in a drought for years.


What can one do but carry on?  It will take decades for the watersheds to recover, so surviving the upcoming rainy season does nothing to guarantee a lack of flood events next spring or summer, or after that.  So, work on the cabin continues, hoping for the best.  Thankfully, various government organizations are doing their part to mitigate damage through town.  I'm being sarcastic.

When I was a little girl, Whitewater creek was lovely.  After a series of big floods every decade or so, the Corps of Engineers channelized the creek in the 80's.  So now, it looks like what you see here.  No riparian zone to speak of, and nothing to slow down or divert water.  Basically a dead zone, a chute designed to move water at an impressive, high velocity.  And yes indeed, each successive flood was worse than the last.  This view is from my neighbor's property looking south (no fire in that direction); about 100 yards from my cabin.  She had previously planted a line of willows to help hold the berm in place for smaller floods.  

While I was visiting, teams of bulldozers deepened and widened the channel and increased the height of the berm.  They worked 7am to 7pm, Sat and Sun, too.  The process was amazing, if horrible and noisy.  It is difficult to tell from this image, but the channel is now about 15 feet deep.  Previously, about 5 feet tall, the berm is now over ten and perhaps as wide.  I feel there is zero protection from this structure because it is not held in place by anything, so any water will swish all the cobble away to grind into the houses downstream.  In fact, I think the entire enterprise will likely make any flood devastating for anyone downstream.  

So I sign off, hoping for the best.  I just want to finish the cabin and have one good, comfortable year.  Is that too much to ask?  Perhaps so.