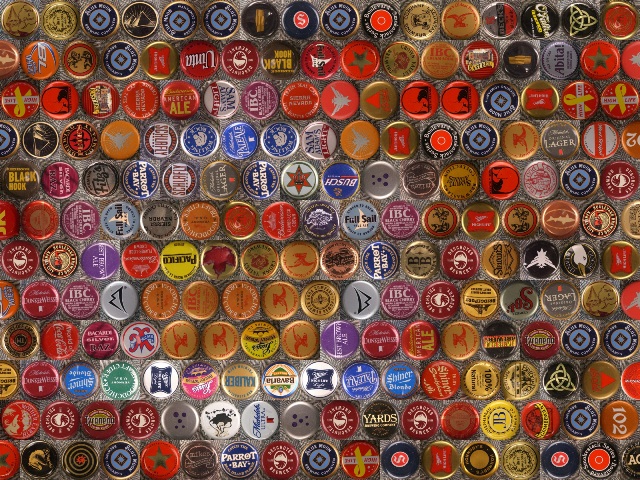
Happy Holidays! This lovely mosaic is made of bottlecaps (amazing I know!) and I created it using the steps outlined in a previous post. If you take a step back, you can see how wonderful the mosaic really is.
The mosaic is a gift to my brother in law who has a thing for Our Lady of Guadalupe. I tried a number of images, including the classic with the Virgin floating on a cloud surrounded by roses, but this version was so pretty it quickly became my favorite.
Some of you may be horrified of the idea of The Virgin Mary made out of bottlecaps, many of them beer caps, but to me this artwork is spot-on perfect. The idea that beauty can come from unexpected, and sometimes mundane, places is very appealing to me. And then there is something perfectly New Mexico about artwork like this - spirituality from simplicity.
Dec 24, 2012
Merry Christmas and Happy Artwork to All!
Dec 9, 2012
Creating the Bottlecap Mosaic, Part 2
In the last post, I described the process for creating the mural image. In this post, I'll show how th individual tiles were made. All 24,000 caps were sorted into milk jugs and various sizes of plastic bags. The point here is that all the caps had to be separated so I could find the appropriate cap for each spot in the mural. When I was ready to create the tiles, I was surrounded by all my jugs and bags arranged by color. Although this photo of my workspace on the porch doesn't look too messy, it also doesn't show the piles of stuff under the three tables.
The mosaic had been output as images of smaller tiles, each numbered by row and section. I followed the image printed on the output sheet, selecting and arranging caps row by row. Once a tile was complete, the caps were moved to my magnetic display board (covered with plastic wrap). The magnets kept the caps aligned and in the correct orientation during the next steps. In retrospect, and FYI if you want to try this yourself, making the board was an incredibly useful move. The project could not have been done without it.
The caps were cleaned with window cleaner (to remove dust, storage grunge & rust), then polished with rubbing alcohol (to dry them and remove any oils). After a few minutes, the tiles were sprayed with a UV protective acrylic sealer. Even though the samples at the cabin show no signs of fading after one year (see previous post), I wanted to make sure the colors last as long as possible. The cabin is in a very dry climate, but protection against rust seemed like a good idea. Just in case.
After 24 hours of drying time, a piece of tulle (for ballerina tutus) was placed over the caps. Four dots of glue (equal mix of Elmers and Eileens Tacky Glue) were dropped onto each cap through the tulle. Because I sealed the caps, regular glue wasn't adhesive enough to hold the caps in place. As I've mentioned in previous mosaic posts, the glue/tulle combo keeps everything in together during shipping and installation, but allows for easy removal of the tulle at the end of the project.
Once dry, each tile was labeled (tile#, top, bottom, right and left) completely. The entire mosaic fit into one large box and it was shipped to NM. Next step installation! Stay tuned...Nov 9, 2012
Creating the Bottlecap Mosaic, Part 1

You may have been wondering about the status of the mysterious bottlecap mural. I know! I haven’t said much about it in a while. After many months, nay years, progress has been made! Earlier this spring I had collected about 30K caps, enough to have all the colors I needed. I spent a lot of time sorting & cataloging the caps, then selected a design.
I decided to utilize an oriental carpet design because I didn’t want anything that looked too ethnic or strongly geometric. I scanned this image from a book, cropped it a bit, duplicated it and created a final mosaic design that would be about 6 ‘ tall and about 14’ wide.
The next step was using the freeware software package Andrea Mosaic. The software was designed to do photomosaics (perhaps you recall their popularity ~10 years ago) and requires a target image and a database of photos from which to recreate the image.
I photographed each unique cap on a grey background (to simulate adobe), then edited all the images to a square format. Andrea Mosaic allows you to set how many times an image can be repeated, whether or not the same image can be adjacent, if rotation is acceptable and the graininess of the final mosaic.

I spent about an hour tweaking settings to give me a mosaic with a good balance of detail and color blending. The software will break your output into pieces so you can work with smaller sizes (very helpful for large mosaics), so I printed out pages that would correspond to tiles about 10x14 inches.
The tile shown here is typical output and if you look closely you may be able to recognize some of the brands of beer, cider or soda. The next step was creating the tiles. That was a lot of work and I'll describe the process in the next post
Stay tuned!
Oct 19, 2012
From Wine Bottles to Bathroom Windows

My father put tiny windows at the top of all north-facing walls in the cabin (the bathroom is shown here). I won't go into the explanation of why he did this (theoretically it makes sense), but these little openings have been a hassle for years. Because the walls are adobe, the sill is about 1 foot deep. Not only does a window have to be placed on the inside, but also the outside of the wall.
For years, I've put off the dealing with the windows because 1) I didn't know what to do with them, 2) tiny custom windows are expensive and, 3) I was hoping I could figure out a way to open the widows. After years of stuffing the openings with insulation and layers of hardware cloth, I've had it. Rodents love these windows and use them as doorways, but the main problem is spiders and insects. I love the little guys, but I don't like the resulting cobwebs/beetle leg/dust bomb combos that result
I love the look of tudor style windows with rondels of glass. Along those lines, I've seen some amazing stained glass done with bottle bottoms and glass plates and I thought I could do something similar. Rondels are expensive, but bottles are free and readily available. Shown at left are some wine bottles that Paul ad I cut (see previous post) for this project. I was concerned about the thickness of the glass, but what the heck, give it a try and see what happens.
By the way, I am not an expert at stained glass. I've dabbled in it, but I am very much an amateur. If you want to try something like this, start simple, have all the appropriate safety equipment and don't expect perfection in the beginning.
In this window, I wanted to combine glass nuggets (from any craft store) with the green glass. The first step was covering all the glass edges with copper foil tape, then arranging the glass pieces on a board, pinning them in place, and last, soldering. Shown at left is the arrangement of glass pieces on the board. As usual with my projects, I deviated from normal procedures: here, I was not creating a perfectly flat window to be inserted into a frame. I won't describe the installation process in detail, but my main concern throughout was maintaining the correct dimensions of the window opening.
At left, I'm holding the window after all the pieces have been tacked together with solder (the silver bead-looking things) on the wrong (outdoor) side. Shown here is the front side which has not yet been soldered. There is still a lot of copper visible and all of that is covered with solder in the next steps. At this point, the window (about 12" square) is quite heavy just from glass alone.
Shown here is the front (indoor) of the window after soldering is complete. Okay, it looks pretty sloppy, but this doesn't concern me because the window is 8' up and no-one is going to be looking at it up close. Because I didn't cut glass to fit between the bottle bottoms, a lot of solder had to be used to fill the spaces. This is a heavy window! At this point in the process, many stained glass artists would treat the solder to darken it. The process uses some nasty chemicals, takes more some more time, and didn't think it would add much to the final appearance of the window.
The installation required two frames attached to the window opening itself. One about 3" inside the sill and another flush to the edge. The stained glass panel fit between the two with some rubber weatherstripping along the edges for an airtight seal. The window itself is set back 3/4" from the face of the wall.
The view shown here is with the bathroom light off and the sun shining in. The little yellow light at the bottom is a set of beer bottles stuck into the adobe wall when it was built (another artistic addition from my father) in the 70's. I like the way the glass from the two types of windows complement one another.
The next windows (two in the kitchen) will be made out of clear glass bottles.
The view shown here is with the bathroom light off and the sun shining in. The little yellow light at the bottom is a set of beer bottles stuck into the adobe wall when it was built (another artistic addition from my father) in the 70's. I like the way the glass from the two types of windows complement one another.
The next windows (two in the kitchen) will be made out of clear glass bottles.
Stay tuned!
Subscribe to:
Posts (Atom)