
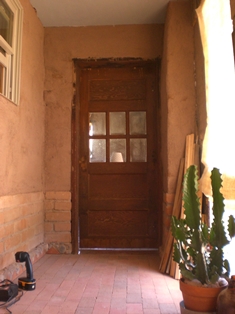
As with so many other things in the cabin, there were issues. My dad found this door somewhere at some point in the 70's (he didn’t buy it) and built the doorway around it. But not in a normal way. The doorway is formed from boards of various dimensions. Each side is different. No stops for the door were installed. The old hinges were huge and extended out from the doorway. There was no doorknob, just a hasp screwed haphazardly onto a board and a combination lock hooked through it for closure.
 Paul and I wrestled the door back into place. It did have to be cut down a bit to make room for the mosaic in the doorway (see previous post). Otherwise, it seemed to fit, but those hinges were still a problem. I had bought a variety of door hinges in the hopes that something would work better (i.e. normally), but because of the way the doorway was constructed, there was no way to use any of them. Back to the ginormous old ones. An additional problem was that the adobe+plaster behind the doorway would crumble (and fall away) whenever normal wood screws were used. The screws were quite hefty to hold such a massive door and were about 3" long. Poor Paul had to use a hacksaw to cut 15 screws shorter.
In the end, the door is pretty much the same as it was before. Sigh. Because the doorway isn't plumb, I don't want to hassle with attempting installation of doorknob hardware. I'll probably use a ball latch that will catch as the door swings. I plan to paint the sunroom side red (matching the lockers opposite) and the living room side a pale blue-grey. As it is now, the aged white side doesn't have an elegant shabby chic look, more like a dirty, battered one. Stay tuned for an update on the painting - perhaps occuring soon!
