Oct 19, 2012

From Wine Bottles to Bathroom Windows


My father put tiny windows at the top of all north-facing walls in the cabin (the bathroom is shown here).  I won't go into the explanation of why he did this (theoretically it makes sense), but these little openings have been a hassle for years.  Because the walls are adobe, the sill is about 1 foot deep.  Not only does a window have to be placed on the inside, but also the outside of the wall.  

For years, I've put off the dealing with the windows because 1) I didn't know what to do with them, 2) tiny custom windows are expensive and, 3) I was hoping I could figure out a way to open the widows.  After years of stuffing the openings with insulation and layers of hardware cloth, I've had it. Rodents love these windows and use them as doorways, but the main problem is spiders and insects.  I love the little guys, but I don't like the resulting cobwebs/beetle leg/dust bomb combos that result  

So, what to do when you're cheap and in a pinch? Use what you have and be creative.

I love the look of tudor style windows with rondels of glass.  Along those lines,  I've seen some amazing stained glass done with bottle bottoms and glass plates and I thought I could do something similar.  Rondels are expensive, but bottles are free and readily available.  Shown at left are some wine bottles that Paul ad I cut (see previous post) for this project. I was concerned about the thickness of the glass, but what the heck, give it a try and see what happens. 

By the way, I am not an expert at stained glass.  I've dabbled in it, but I am very much an amateur.  If you want to try something like this, start simple, have all the appropriate safety equipment and don't expect perfection in the beginning.

In this window, I wanted to combine glass nuggets (from any craft store) with the green glass.  The first step was covering all the glass edges with copper foil tape, then arranging the glass pieces on a board, pinning them in place, and last, soldering. Shown at left is the arrangement of glass pieces on the board.  

As usual with my projects, I deviated from normal procedures: here, I was not creating a perfectly flat window to be inserted into a frame.  I won't describe the installation process in detail, but my main concern throughout was maintaining the correct dimensions of the window opening.
At left, I'm holding the window after all the pieces have been tacked together with solder (the silver bead-looking things) on the wrong (outdoor) side. Shown here is the front side which has not yet been soldered.  There is still a lot of copper visible and all of that is covered with solder in the next steps.  At this point, the window (about 12" square) is quite heavy just from glass alone.


Shown here is the front (indoor) of the window after soldering is complete.  Okay, it looks pretty sloppy, but this doesn't concern me because the window is 8' up and no-one is going to be looking at it up close.  Because I didn't cut glass to fit between the bottle bottoms, a lot of solder had to be used to fill the spaces. This is a heavy window!  At this point in the process, many stained glass artists would treat the solder to darken it.  The process uses some nasty chemicals, takes more some more time, and didn't think it would add much to the final appearance of the window. 


The installation required two frames attached to the window opening itself.  One about 3" inside the sill and another flush to the edge.  The stained glass panel fit between the two with some rubber weatherstripping along the edges for an airtight seal.  The window itself is set back 3/4" from the face of the wall.

The view shown here is with the bathroom light off and the sun shining in.  The little yellow light at the bottom is a set of beer bottles stuck into the adobe wall when it was built (another artistic addition from my father) in the 70's.  I like the way the glass from the two types of windows complement one another.


The next windows (two in the kitchen) will be made out of clear glass bottles.

Stay tuned!

Aug 17, 2012

in through the out door

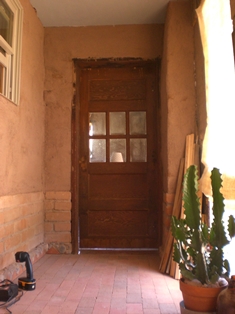
Between the sunroom and living room is a doorway.  The door was removed years ago to finish plastering both rooms. This spring it was returned to it’s former place.  What a job!  This is an old-fashioned (at least 50 years old), exterior, wooden, security door.  It is 2 inches thick with steel re-enforced windows - a chunk - and, as far as I can tell, nearly indestructible. It has lived outside for 2 years exposed to the elements with zero negative effects - a tough door.

As with so many other things in the cabin, there were issues.  My dad found this door somewhere at some point in the 70's (he didn’t buy it) and built the doorway around it.  But not in a normal way.  The doorway is formed from boards of various dimensions.  Each side is different.  No stops for the door were installed.  The old hinges were huge and extended out from the doorway.  There was no doorknob, just a hasp screwed haphazardly onto a board and a combination lock hooked through it for closure.

Paul and I wrestled the door back into place.  It did have to be cut down a bit to make room for the mosaic in the doorway (see previous post).  Otherwise, it seemed to fit, but those hinges were still a problem. I had bought a variety of door hinges in the hopes that something would work better (i.e. normally), but because of the way the doorway was constructed, there was no way to use any of them.  Back to the ginormous old ones.  An additional problem was that the adobe+plaster behind the doorway would crumble (and fall away) whenever normal wood screws were used.  The screws were quite hefty to hold such a massive door and were about 3" long. Poor Paul had to use a hacksaw to cut 15 screws shorter.

In the end, the door is pretty much the same as it was before.  Sigh.  Because the doorway isn't plumb, I don't want to hassle with attempting installation of doorknob hardware.  I'll probably use a ball latch that will catch as the door swings.  I plan to paint the sunroom side red (matching the lockers opposite) and the living room side a pale blue-grey.  As it is now, the aged white side doesn't have an elegant shabby chic look, more like a dirty, battered one.  Stay tuned for an update on the painting - perhaps occuring soon!

Aug 3, 2012

Sometimes a little grey is good

When facing the kitchen shelves with aged wood, I didn’t want to fuss with mitered joints.  I didn’t think it was necessary.  A small detail however, is that a lapped joint shows a bit of clean, non-aged wood right at eye level.  What to do?

I remembered reading about aging wood using tea, vinegar, and rusty nails.  Having all those items at hand in the cabin, I set to work.  At the time I couldn’t remember the proper order of treatments, and I don’t know if it really matters.  The basic concept (familiar to anyone who works with natural dyes) is mixing tannins with iron to create a black pigment.  On wood, the color is grey and it really does match aged wood.  The surface texture will differ, but for a tiny bit of wood, at an edge, this is a great technique.

In the photo above, you can see the effects of two applications on one half of an aged wood scrap; I used one application for my shelf. I also treated the top and bottom surfaces of the shelves (1/4" plywood).  The surfaces are a smooth grey and match the color of the edge closely enough that the entire shelf seems like one very thick board.

I’ve found a recipe online similar to the one I recall from the past.  If you try the technique, play around with the number of applications of each solution to get the intensity of grey you need.  There is a strong vinegar smell while the wood is moist, but disappears when dried.  The solutions are relatively safe, but even so, I wouldn’t leave them around kids or pets; they can be safely poured down the sink when you are finished.

Jul 20, 2012

building an horno

Driving through northern NM, one sees hornos (bread ovens) pretty much everywhere. They are especially common in the Pueblos, but are found in the backyards of many older homes. An excellent way to bake breads (and meat) in the summer, the ‘modern’ hornos are based on Spanish/Moorish designs brought over back in the 1500's. Built from adobe, all they require is the right mix of soils, water, and an afternoon. Unlike modern adobe bricks which contain additives to make them water resistant, adobes for ovens must be totally additive free - this makes the project even more do-able for the beginner - and are simple to make at home.

Recently, my family got together to help my father build an horno.  He has built with adobe for over 40 years and founded a school to help people build their own homes.

The base of this horno is dry stacked concrete blocks and adobes. The cooking surface is a single layer of redbrick. For this morning’s work (about 2 hours), four of us were able to mix mud, trim adobes and set 4 layers of bricks. The entire project could easily be finished in a day; add another day for a layer of mud plaster.
The first step is adding a layer of mud onto the bricks.


The interior diameter is sketched onto the bricks and the adobes added on top. Both sides should be level. The mud joints are smoothed with a spoon.


The doorway is made from redbricks set in mud. Each course starts with the door bricks and then follows around with adobe.  


Bricks are cut to size by chopping off chunks. Precision is not important because spaces can be filled with mud.


After the 2nd course, the bricks start to angle up on the exterior side.  Mud is added as before, but now more is added on the exterior edge than the interior one.


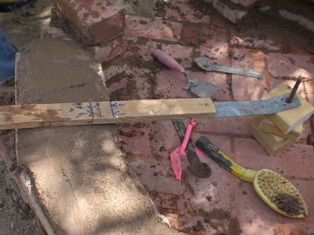
The process from now on creates a 2-d roman arch. The only technological assistant is a piece of rebar and flat stick with a line drawn to mark the interior diameter of the horno.

The adobes are placed on the mud, matching the interior edge with the line on the stick.  


Instead of checking level from side to side, the adobes must be level with the flat edge of the stick to achiive the proper angle for the next course.


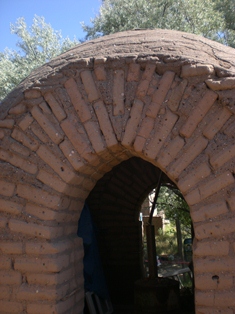
And so it goes, course by course.  At the top the adobes will be nearly vertical and are held in place by friction with the mud.  Believe me, it works.  Once the last adobe is placed in, the ring locks into place and becomes very strong.  This is the process by which elegant adobe buildings were built throughout the middle east (and in some places sill are).

This is the process by which elegant adobe buildings were built throughout the middle east (and in some places sill are).  Shown here is a building in progress with a double roman arch doorway set into an adobe dome.  As lovely as it is outside, it is quite impressive inside looking up.