Recently, my family got together to help my father build an horno. He has built with adobe for over 40 years and founded a school to help people build their own homes.
The base of this horno is dry stacked concrete blocks and adobes. The cooking surface is a single layer of redbrick. For this morning’s work (about 2 hours), four of us were able to mix mud, trim adobes and set 4 layers of bricks. The entire project could easily be finished in a day; add another day for a layer of mud plaster.
 The first step is adding a layer of mud onto the bricks.
 The doorway is made from redbricks set in mud. Each course starts with the door bricks and then follows around with adobe.
  Bricks are cut to size by chopping off chunks. Precision is not important because spaces can be filled with mud.
After the 2nd course, the bricks start to angle up on the exterior side. Mud is added as before, but now more is added on the exterior edge than the interior one.
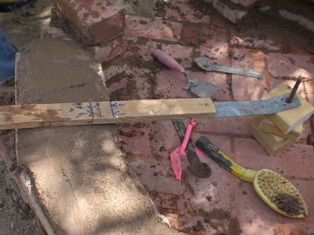
The process from now on creates a 2-d roman arch. The only technological assistant is a piece of rebar and flat stick with a line drawn to mark the interior diameter of the horno.
The adobes are placed on the mud, matching the interior edge with the line on the stick.
 Instead of checking level from side to side, the adobes must be level with the flat edge of the stick to achiive the proper angle for the next course.
And so it goes, course by course. At the top the adobes will be nearly vertical and are held in place by friction with the mud. Believe me, it works. Once the last adobe is placed in, the ring locks into place and becomes very strong. This is the process by which elegant adobe buildings were built throughout the middle east (and in some places sill are).
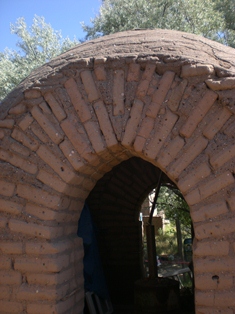
This is the process by which elegant adobe buildings were built throughout the middle east (and in some places sill are). Shown here is a building in progress with a double roman arch doorway set into an adobe dome. As lovely as it is outside, it is quite impressive inside looking up.


